
I’ve posted about configuring Cisco Identity Services Engine ISE for a few use cases however have had requests to explain the steps to setup a basic lab. This post serves as a guide to get a basic ISE lab running to test LAN or Mobile devices. My lab uses an Apple Macmini as an ESXI 5.1 server hosting the ISE virtual machine (explained HERE). See the configuration guides for details on configuring a lab.
Virtual Machine Setup: Download the latest ISE .ISO file from cisco.com. Access the ESXI GUI and select New Machine. The recommended specs for a custom New Machine:
- Virtual Machine version 7
- Linux 5 32 bit
- 2 virtual CPU
- 4 gig of memory
- 60 gig of space – thin provisioning (I find thick isn’t necessary for a lab)
This video provides details on the ISE installation HERE
Once ISE is operational, log into your system with the user name and password set during the installation process.
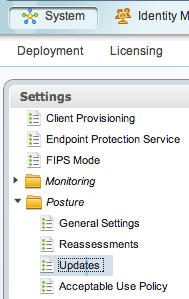
ISE Updates + Passwords: Select Administration Tab -> System -> Settings. On the left column select the carrot for Posture and Updates. Click update now and also setup how often you want to auto update.
To update ISE login policies so you don’t lock yourself out, go Admin Tab-> System -> Admin Access. Select Authentication and the last tab for Password Policy. I suggest simplifying the policies for a lab that is secure. You can also add a second administrator in the event your primary login gets locked out via the Administrators -> Admin Users area under Admin Access. NOTE: The password reset process is painful so have a backup plan built in.
 Updates for ISE
Adding Active Directory: Select Administration -> Identity Management and External Identity Sources. This is where you add your Active Directory information. The steps are adding AD, joining AD, selecting the Groups tab and selecting which groups ISE will use to authenticate.
This video covers the details HERE
Adding Network Devices: You need to adding Switches, Access Points, etc. to ISE. Go under Administration -> Network Resources and Network Devices. Click ADD. Give it a name, provide the IP address, shared Radius info under Authentication Settings and SNMP under SNMP Settings.
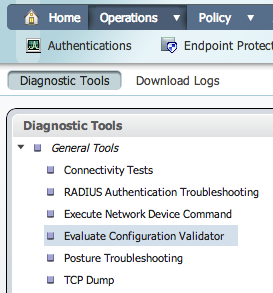
Your network devices will need to have Radius enabled and pointing Radius to the new ISE server. The best way to test a Switch is by scanning its config with ISE for missing commands. This ISE tool is found under Operations -> Diagnostic Tools. On the left column, select the carrot for General Tools and select the Evaluate Configure Validator. You will be asked to input the device IP and login credentials as it scans the configuration. The tool will flag any missing commands. Some are not necessary however the majority are required. Make sure to pass this scan prior to adding your devices to ISE.
Config Validation Tool
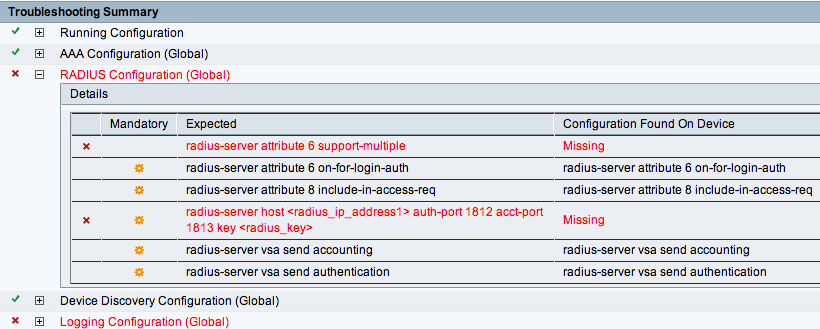 Cisco Configuration Evaluation Tool
Enabling Profiling: Select Administration Tab -> System -> Deployment. After the popup, select your ISE server. Click “enable profiling services” and click profiling and enable which profiling capabilities you wish to test.
To update ISE so devices can re-authenticate when the profile changes, go to Administration -> System -> Settings. Click the posture carrot and select profiling. Change the CoA to reauth and click save.
You can view default profiling policies under Policy -> Profiling as well as the conditions that make up those policies under Policy Elements -> Conditions and select the profiling tab.
Profiled devices are found under Administrator -> Identity Management -> Identities and select Endpoints on the left column.
This post talks more about ISE profiling HERE
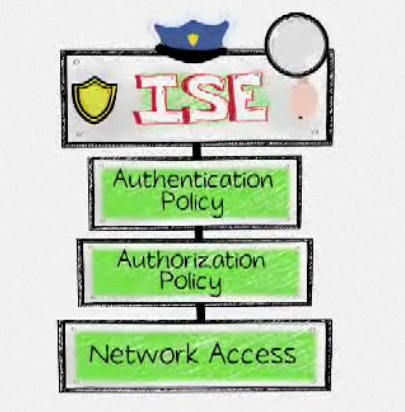
Basic Policies:
Authentication: This is where you configure the device access type and protocol used. For example, you can select IF Wired_802.1x or Wireless_802.1x (using the + sign and adding a new Condition such as one being Wired and the other being Wireless). Next select a specific authentication protocol or leave default for any. Last thing is selecting where users are authenticated against by selecting the carrot after AND.. and choosing the USE field. The default is internal users however if you added Active Directory, you can update this to the AD group configured in a previous step.
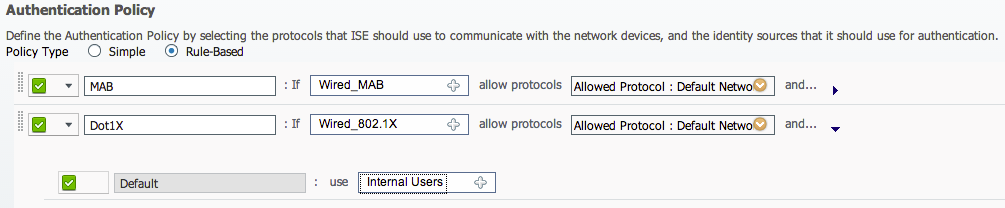
Example of ISE Authentication for 802.1x Wireless users verified against ISE Internal Users Database
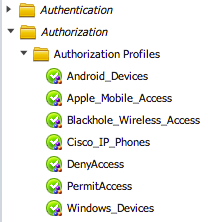
Authorization: This is where you define authorization policies once a device is authenticated. An Example could be “If a Apple iPhone OR Apple iPad” then provide a permission named “Apple Access”. To build this, you would add a new RULE and give it a name. Next, select the IF statement and change any to a profiled endpoint such as Apple iPhone. These won’t appear by default until you follow the previous profiling section to “Create Matching Identity Group” for Apple iPhone. You can add multiple if statements that default as a OR.

Example of ISE Authorization for Any Profiled Apple Device and Username is joey then place in Apple_Mobile_Acces Policy
To authenticate “If a Apple iPhone OR Apple iPad” AND “user must equal AD group ADMINS” meaning an approved admin user on an ipad, you can select attributes -> create new condition. Under Expression, select the attribute under your named Active Directory server or go with internal user, select = and either the AD group or a specific user. The previous example users a internal user joey.
To Provide Apple_Access, you need to first build this as explained under Permissions. Once built, you can make your THEN statement Apple_Access. If its not built yet, select PermitAccess until the proper permissions option is configured and available to select.
ISE reads policies top down so think about how polices should flow. The end policy should be a default policy of denying traffic once you are finished. For example, you may have a Main policy for full access with lots of checks at the top, next have a Guest policy with limited access and end with a default deny all. The default last policy is PermitAccess.
Permissions: This is where you define where devices that pass ISE authentication end up. Select Policy -> Policy Elements -> Results. On the left column select the carrot for Authorization, and folder for authorization profiles. Click ADD to create a new profile. Give it a name and scroll down to choose what you want to do with authenticated devices. For example, you can select a specific VLAN or Dynamic ACL. DACLs are configured in the folder directly under the Authorization Profiles.
Once you build your profile, it will be available as a THEN option under authorization.
ISE Authorization Profilers used for the THEN part of Authorization policies.
There is a lot more that can be done with cisco ISE however this should be a good starting point to see some traffic in your lab. To verify endpoints, go under Operations -> Authentications to see if devices are being authenticated.
![]()
User Employee using a Apple Device gaining switchport acces
You can also click Administration -> Identity Management and select the Endpoints folder to see if Profiler has captured anything.
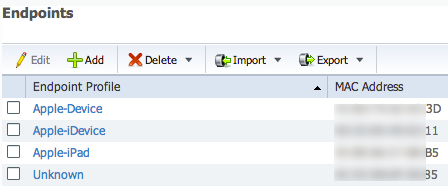
Example of endpoints profiled by ISE
Related posts:
 Are you 802.1x ready? What it takes to enable 802.1x using Cisco ISE
 Cisco Identity Services Engine ISE 1.1 Profiling – Identify And Monitor What Is On Your Network
 Identifying Advanced Persistent Threats ATP Using Netflow – Lancope StealthWatch Overview And Lab
Hi,
I’m assuming you can only make this “home lab” if you have a physical switch?
I need to implement wired security with Cisco ISE on C3750(X) switches. I’d love to try this out first in a home lab. I currently have a VM running Cisco ISE and Windows Server for AD. I also have a server running RADIUS. The only problem I have left I don’t have a 3750 switch or software able to simulate one.
You only described how to create a home lab with Cisco ISE in it. But you are currently not doing anything with it???
Hi Vergauwen. Yes the assumption is you will be adding a network device since this is network admission control technology. This can be a switch, wireless AP or VPN concentrator. I try to keep posts short so trying to summarize the entire configuration process is tough without writing a million lines. Plus there are detailed configuration documents for specific tasks such as adding a device.
To address your concern, you will first need to verify if the device is supported. That list can be found via http://www.cisco.com/c/en/us/td/docs/security/ise/1-2/compatibility/ise_sdt.html for 1.2. Next you need to manage a device. Those steps can be found here http://www.cisco.com/en/US/docs/security/ise/1.0/user_guide/ise10_man_network_devices.html. Hope this helps. You don’t need a 3750x to test. I’m using a 8 port 3560 for my personal lab.
Can you please point me to the correct link to watch the videos? Thanks, Jose
Fixed the links. Thanks for the heads up. In summary, check out the labminutes.com website via their ISE section.
will this work if I use Centos Linux