
In the past, I wrote how to build a Lancope Stealthwatch lab found HERE. Since then, Cisco has acquired Lancope and many changes have been made including major improvements to the web GUI. I decided to delete my old lab and build a new one based on the latest 6.7.1 code. This post will cover how to install and configure a Lancope Stealthwatch lab made up of a Manager, Collector and Sensor.
To kick things off, it is important to understand the available components. These can either be physical appliances or virtual appliances. This post will use virtual appliances for everything.
- StealthWatch Manager (SMC) – This is the centralized system that manages all other components. Administrators will access this system’s IP for GUI management.
- StealthWatch Collector – This is what collects NetFlow. All devices generating NetFlow will send data to this device for correlation.
- StealthWatch Sensor – This converts raw data into NetFlow on behalf of devices unable to send NetFlow. This also can view application layer data providing additional context.
- StealthWatch Identity Box OR Cisco ISE – These identify users and devices based on authentication and profiling. IP addresses are linked to USER information.
- StealthWatch UDP Director – This replicates UDP management data such as Flow data, SNMP traps and syslog. The value is you only have to enable NetFlow once and point it at the UDP director verses having to update the entire network anytime you need to change where flow is being sent.
- StealthWatch SLIC – This is a reputation feed that correlates external known threats with possible insider threats.
The first step to building a lab is obtaining the .OVF files. Once you download those (speak to your Cisco solution provider for more details), add those to your VM environment.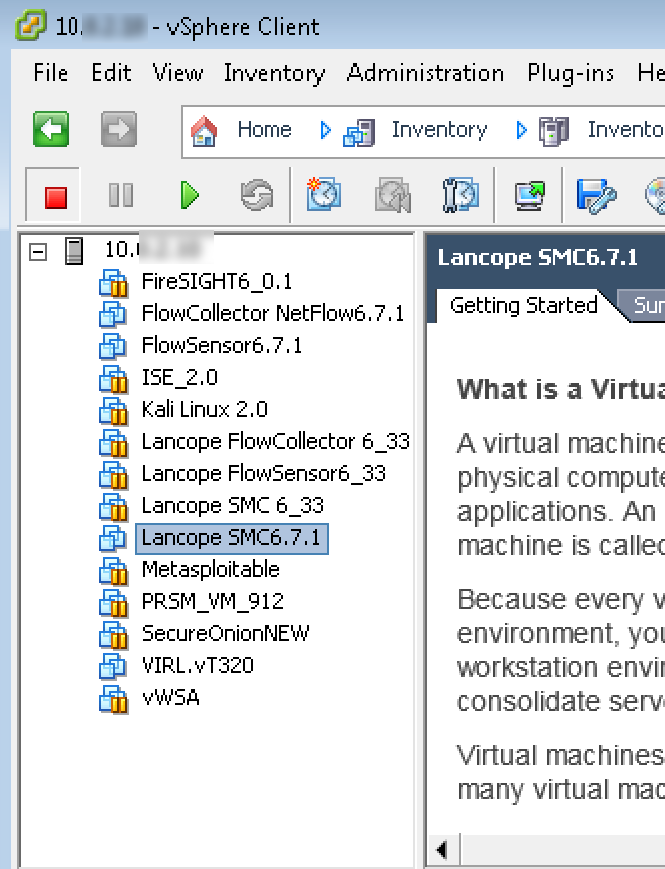 When you power each on, it will ask you for very basic network information (IP address, mask, DNS, etc.). It will finish the basic setup and give you a prompt. At this point, you can log into the system from the GUI using an Internet browser. The next example is the prompt after installing a FlowSensor.
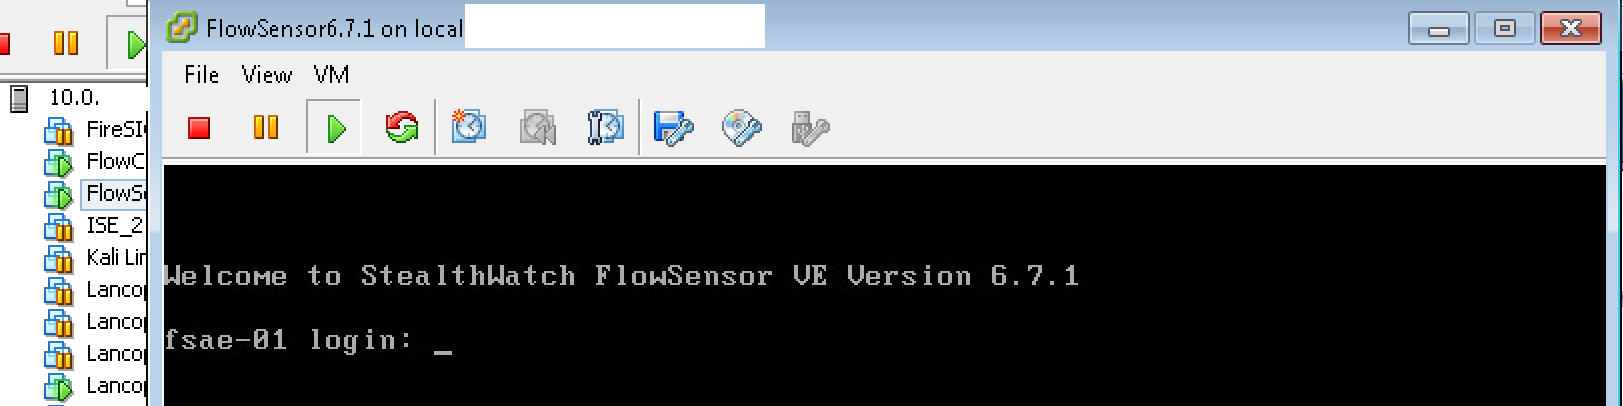 Open a browser and put in the IP address of your virtual server you have installed. I’ll start with the manager for this example. You should see a login screen after accepting that it’s a non trusted site.
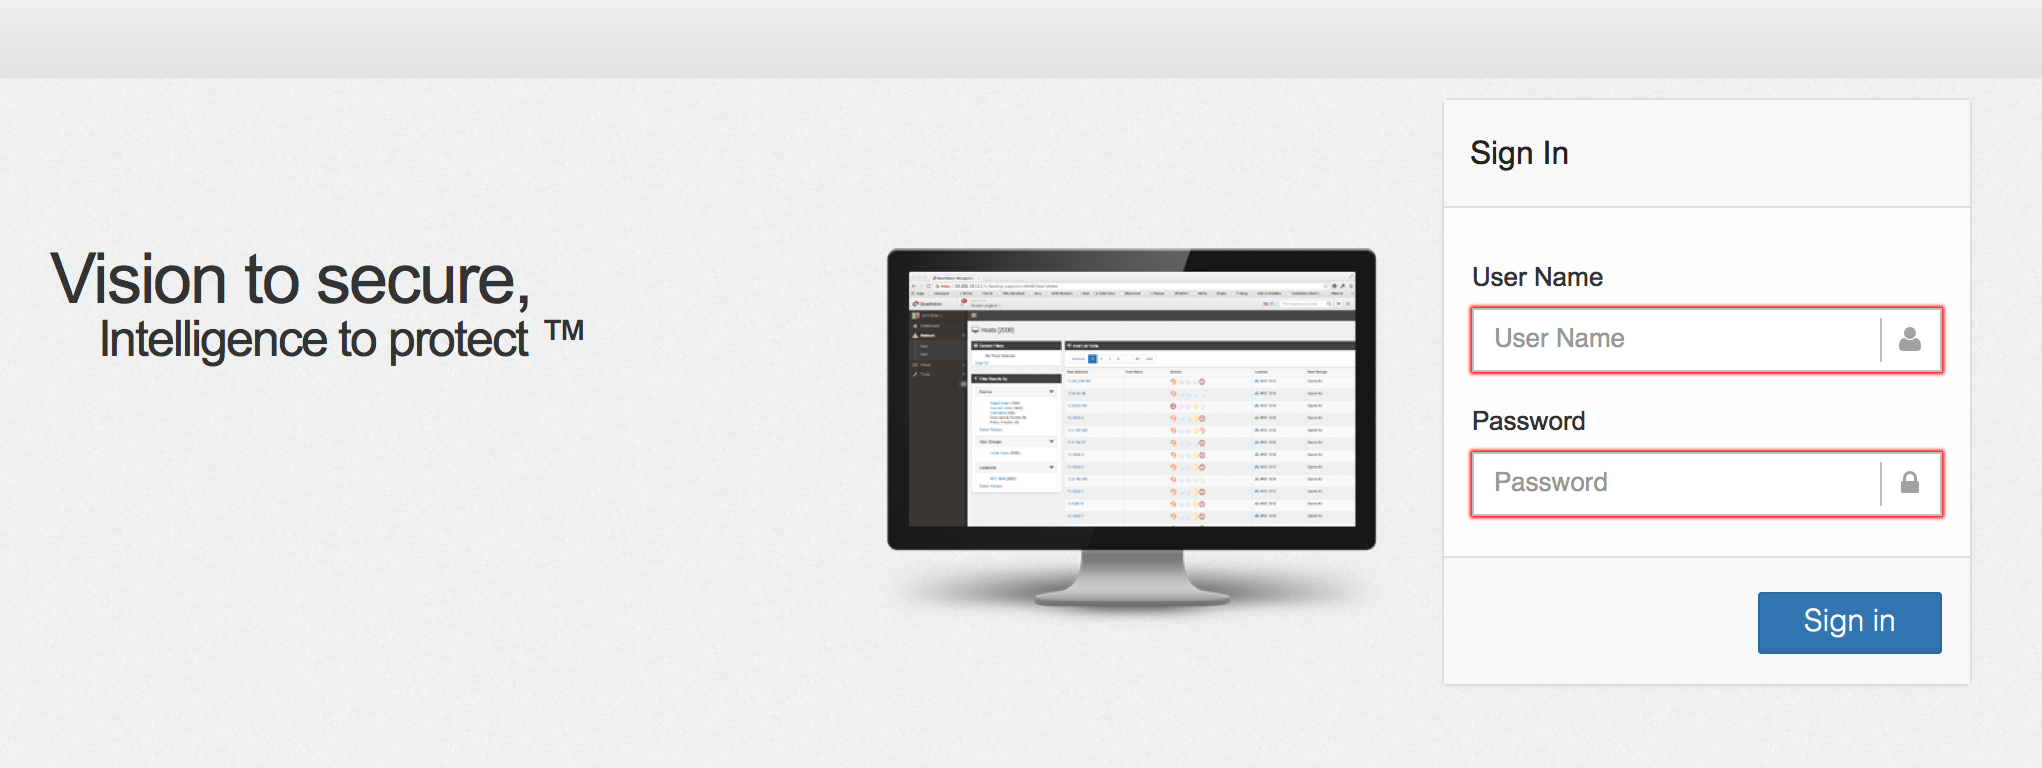 Log in with the default credentials, which are admin and lan411cope. You will be sent to the setup wizard.
 You may want to repeat powering up and performing the basic set up process for your Collector and Sensor since you will be adding them during the SMC setup wizard process. The steps are exactly the same for each stealthwatch virtual server. You load the .OVF, provide the basic network information, let it finish and you will be able to access the GUI like the SMC after seeing the login prompt in the command line popup during the initial setup.
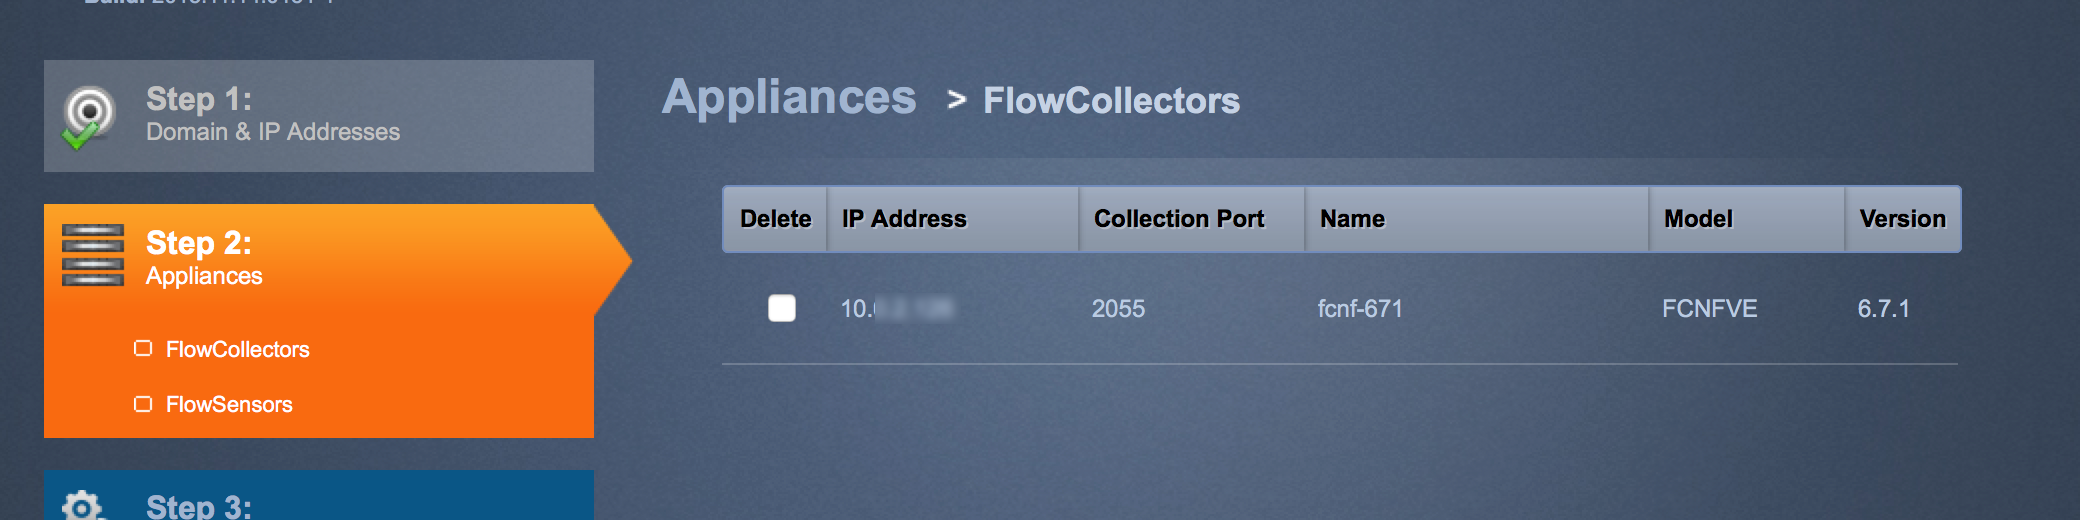
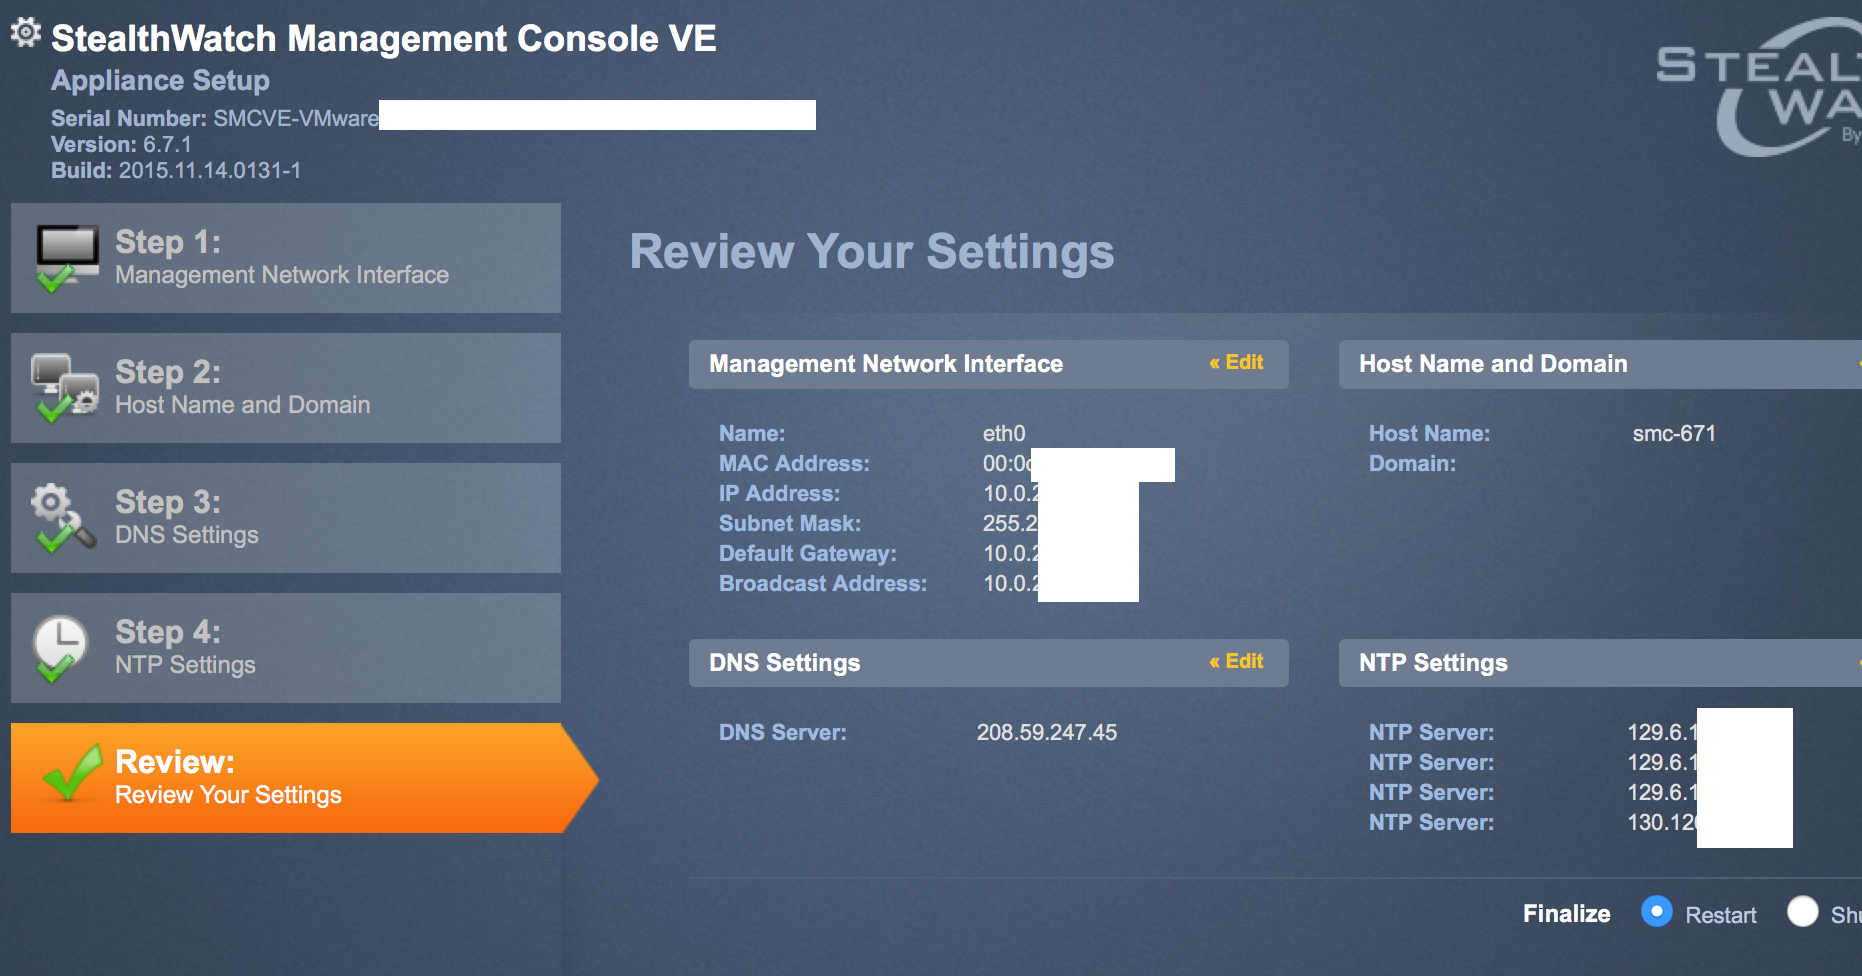 The first part of the SMC wizard will walk you through the basic network settings. Most of this should be the same stuff you used when you first went through the basic setup. You will also be asked to add your Flow Collectors followed by Flow Sensors. As you add each, they should appear if things go correctly. Note that first you add the collectors and click next before you add the sensors.
 Now you need to enabled licensing. You can do it locally or remotely. If you have spoken with your Cisco reseller and properly registered, all you need to do is log into the stealthwatch server, click configuration lab for each appliance / virtual appliance, click licensing and select online licensing. This should activate your license. If you go with the offline option, select offline option and upload the license file.
 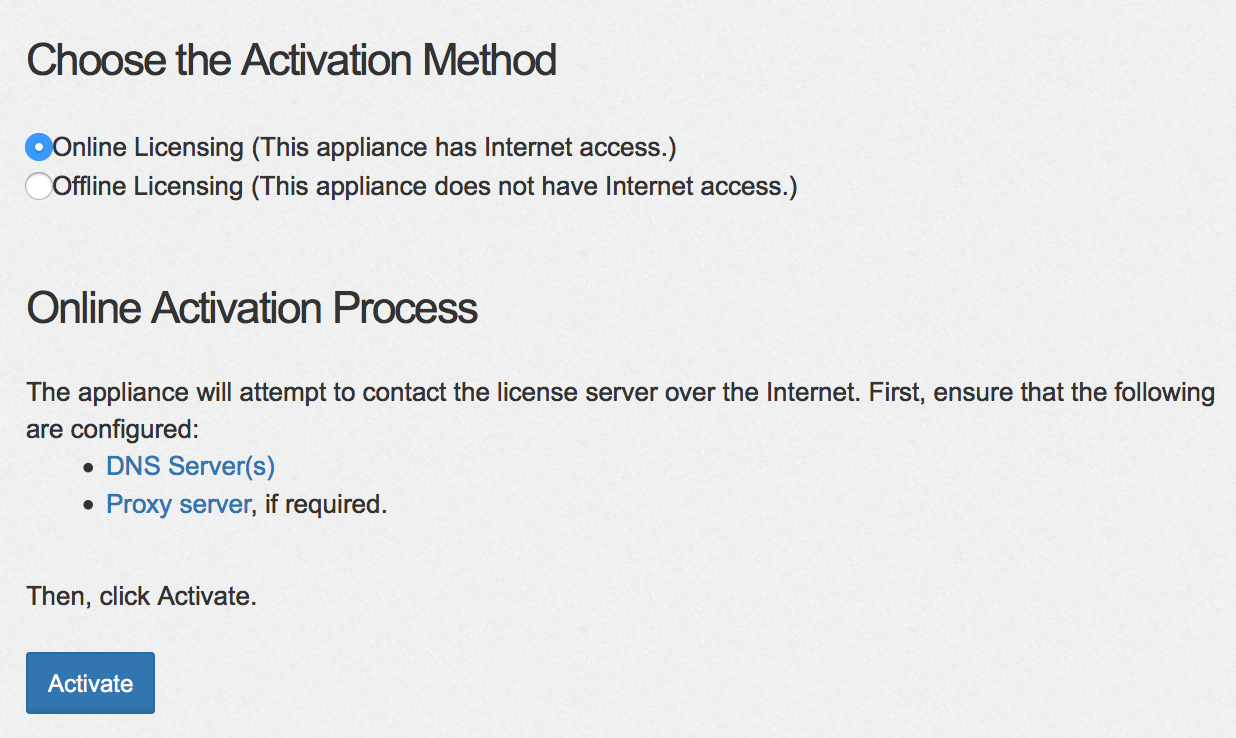 Once things are licensed, you should log in each GUI to change the password and update time. Time is found under System Time and NTP located in the configuration section. Change Password is found under the Manage User section. You should reboot each appliance after the time is changed.
In the past (and in my older lancope post), there was a section for adding a ESXI system to monitor VM to VM traffic. Lancope removed the API call so now you view VM to VM traffic by creating a promiscuous port group and having your virtual sensor monitor it. This is setup by going to your ESXI system, clicking the server and clicking the configuration tab. On the left, click Networking to bring up your list of virtual switches. 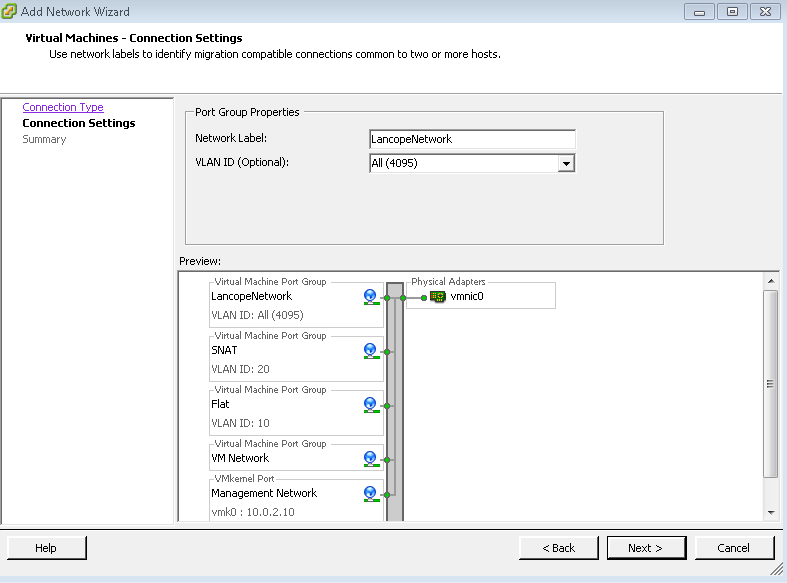 Click the properties link. Click Add and select to add a new Virtual machine. Give it a name and change the VLAN ID to select ALL 4095. Click next and finish. Now click your new port group you just created and click edit. Now in the tabs, select the Security tab to display the policy exceptions.
  Click the box next to Promiscuous Mode and change it to accept. Click OK. Now change your Lancope sensor outside network interface to this new port group so it can start converting the raw network traffic to Flow that will be sent by the other network card to the collector to be processed by the manager. You can also pick a existing virtual switch and change its policy to Promiscuous mode accept and later place one sensor port on it to convert VM traffic to flow. The key is to have promiscuous mode setup and vlans setup so the stealthwatch sensor can see the proper traffic.
That is really all you need to do to get a basic setup going. If you have a SLIC licenses, you can log into the SMC GUI, click to launch the java, click the SMC triangle to bring up the license key popup and place your license to register you system. Once registered, you should see the various threat feeds popular your system. 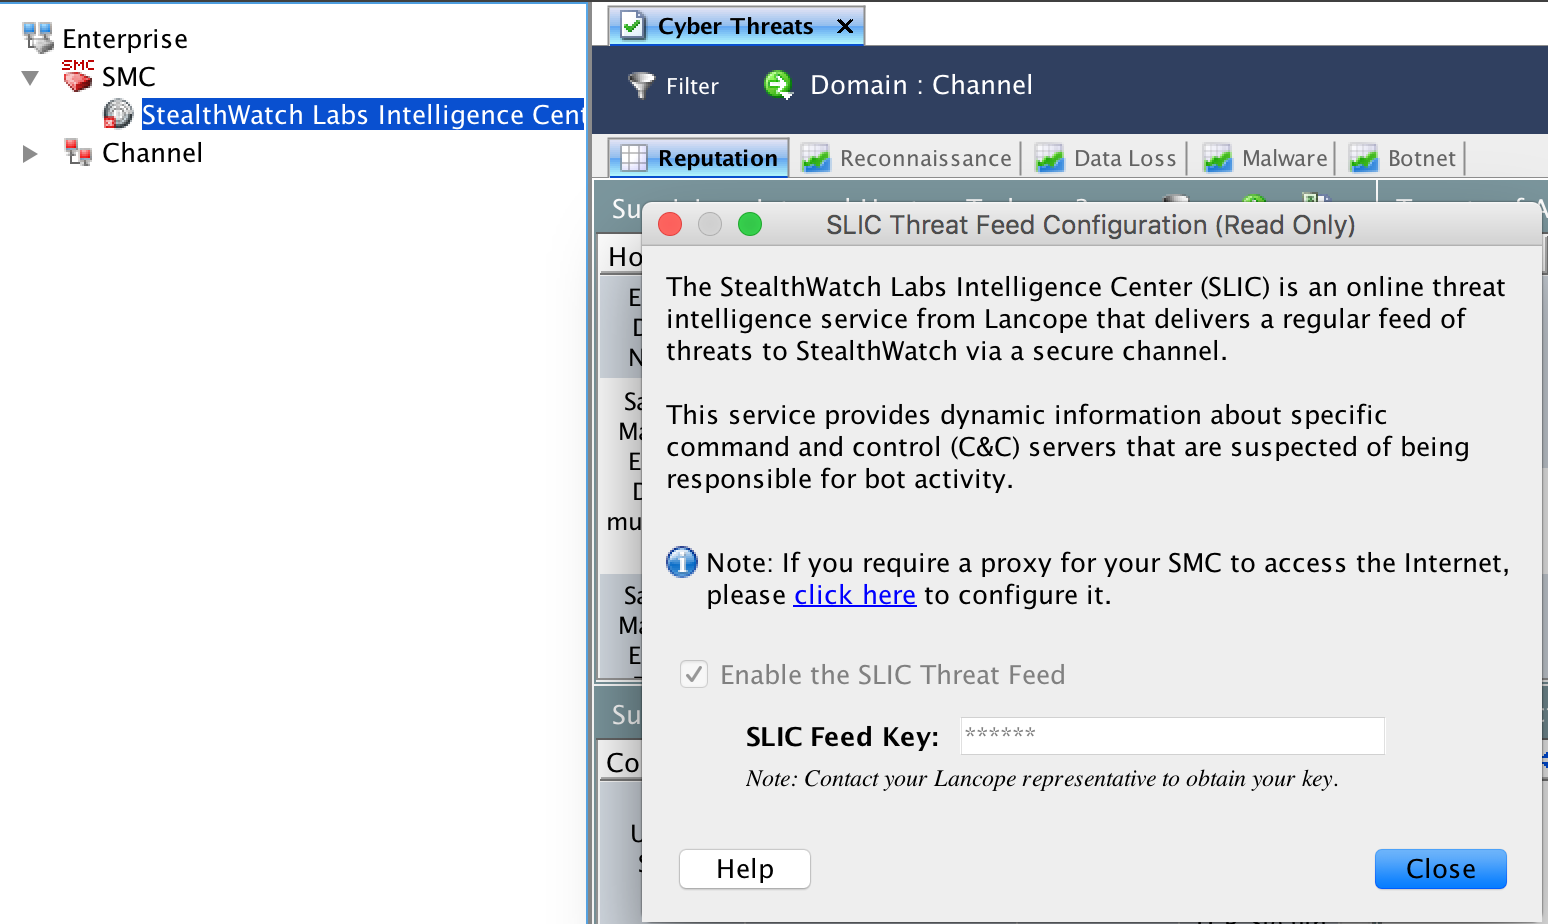 Take the time to check out some of the default reports and network maps. My personal favorite is the Cyber Threats Dashboard.
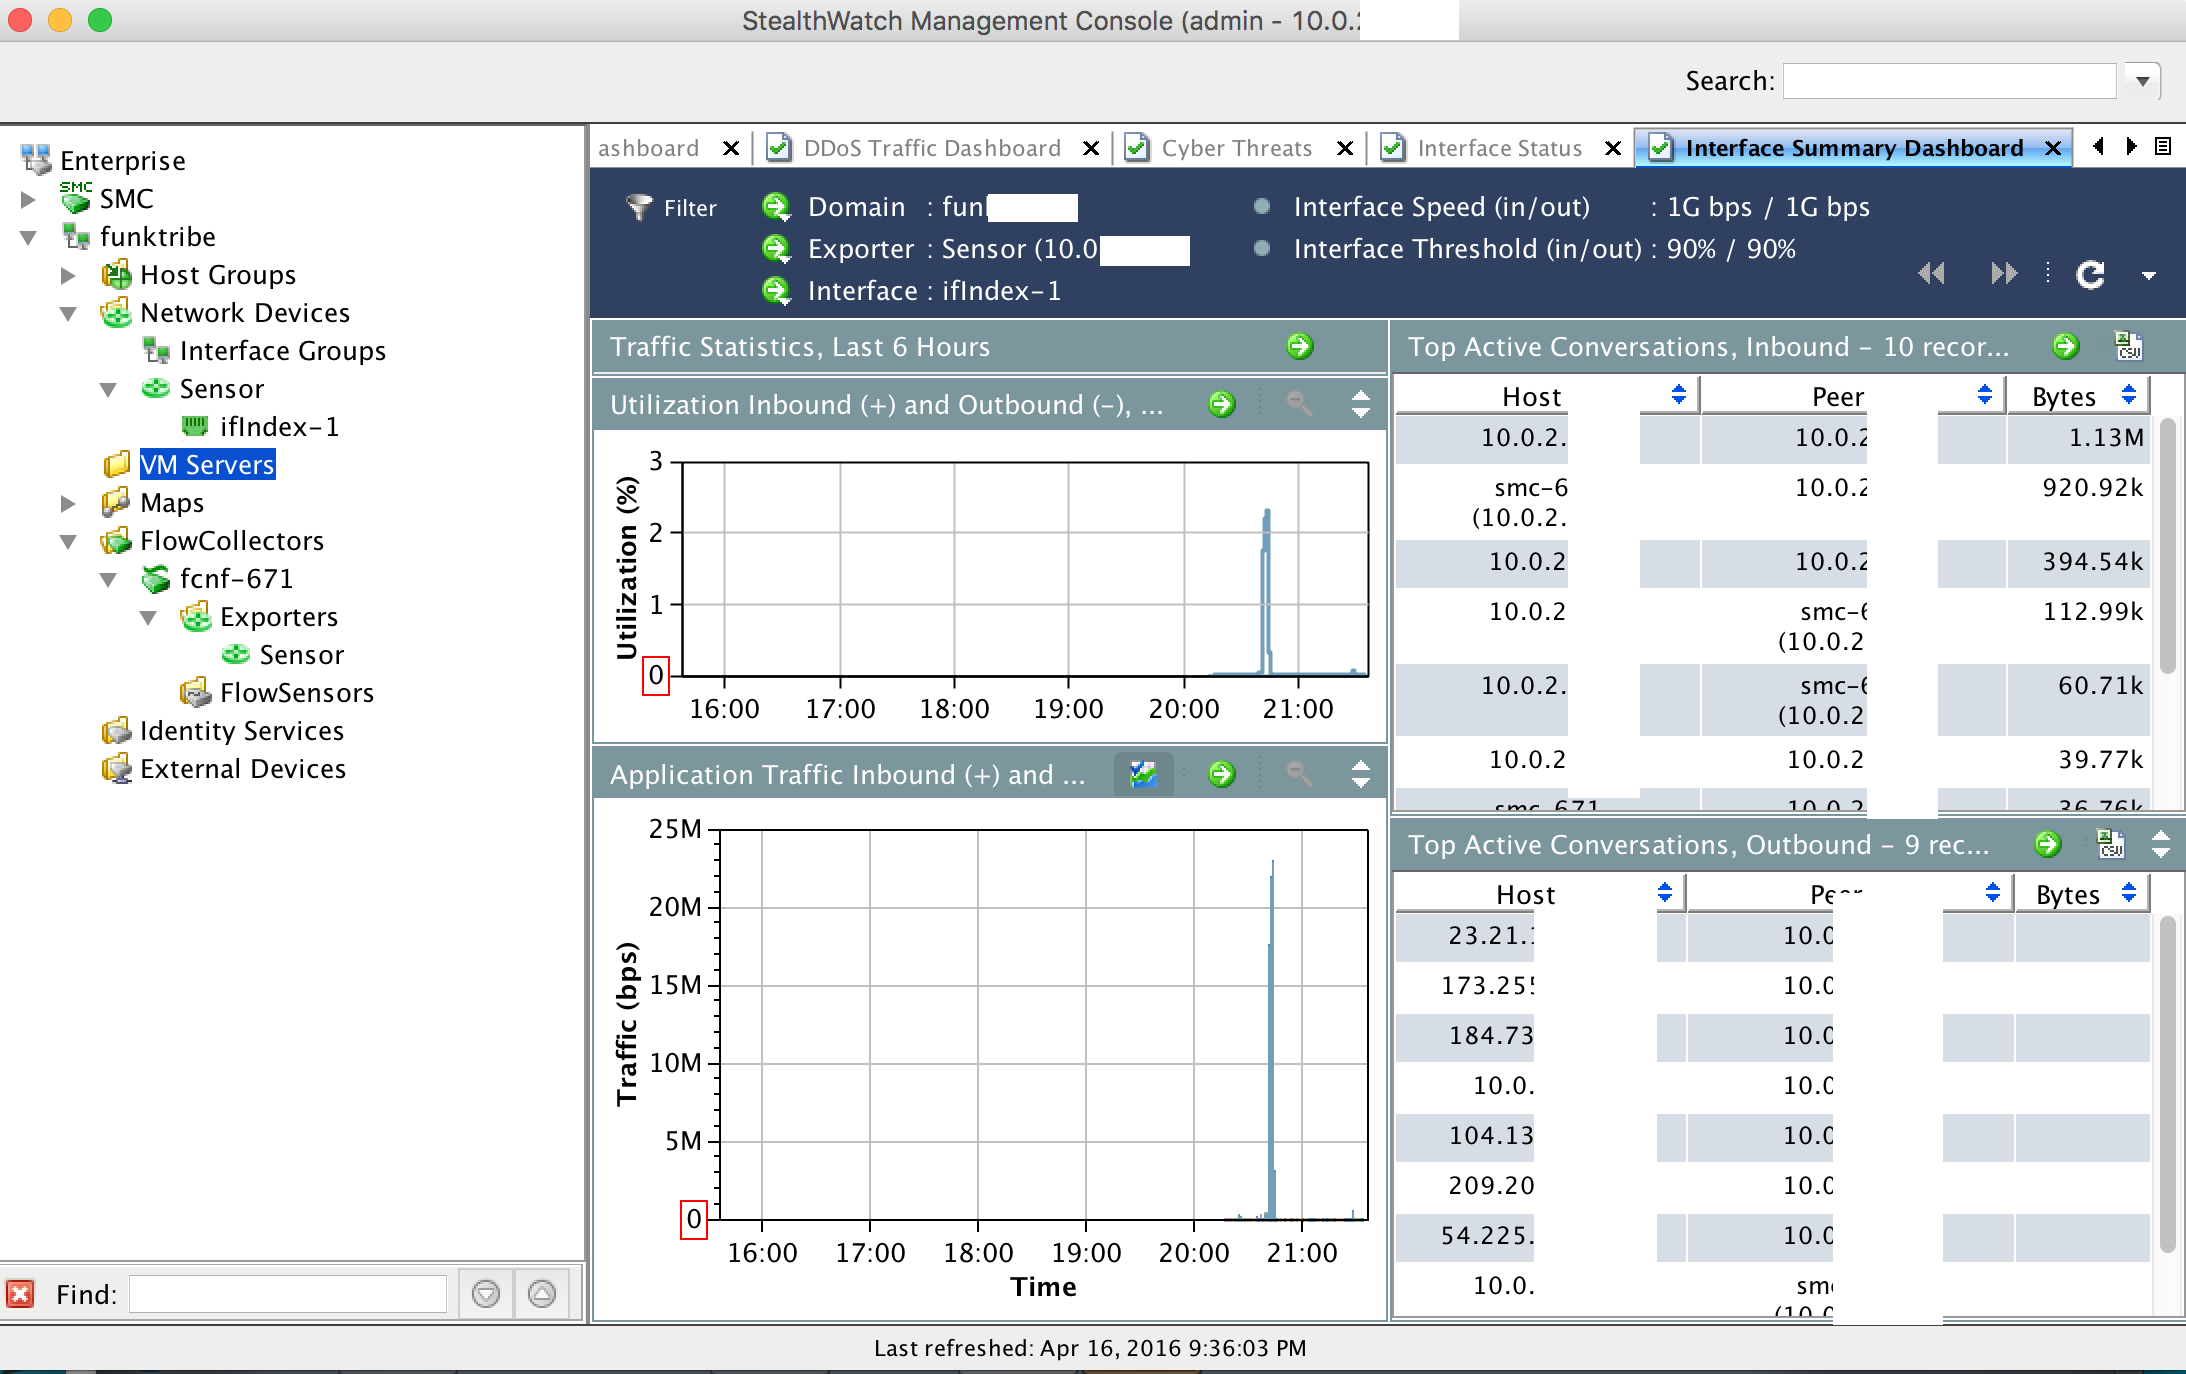
Related posts:
 Identifying Advanced Persistent Threats ATP Using Netflow – Lancope StealthWatch Overview And Lab
 Post NAC: Cisco Identity Services Engine (ISE) and Lancope StealthWatch for Total Access Control
 Advanced Malware Protection AMP for Endpoints Overview